Ableton Crash Course: From Zero to AI-Generated Beats
I opened Ableton for the second time ever. By the end of the weekend, Claude Code was writing drum beats for me while I played guitar over them.
I opened Ableton for the second time ever. By the end of a weekend I had Claude Code writing drum beats for me while I played guitar over them.
This is not a comprehensive Ableton guide. This is what it took to get from “I have gear and no idea” to “I have a finished thing.” Six steps. The last one involves typing natural language into a terminal and watching a drum pattern appear in your DAW, which is either the future of music or the death of it. Probably both.
What you need: Ableton Live 12 (any edition, and there’s a free trial), an audio interface (I’m using a Focusrite Scarlett 4i4), a MIDI controller (Arturia Minilab 3), a guitar or whatever you play, and Claude Code. I’m assuming you have all of this installed. If not, go do that. I’ll wait. If you’re still shopping for gear, I’ve got recommendations at the bottom.
What this is not: A mixing course. A sound design tutorial. A “which version should I buy” post. The goal is operational, not masterful.
Shortcuts you’ll use constantly:
| Shortcut | What it does |
|---|---|
| Cmd+T | New Audio Track |
| Cmd+Shift+T | New MIDI Track |
| Tab | Toggle Session / Arrangement View |
| B | Draw Mode (pencil tool) |
| Cmd+U | Quantize selected notes |
| Cmd+A | Select all |
| F9 | Record |
| Spacebar | Play / Stop |
Step 0: Project Setup (The “Can I Hear Myself?” Test)
Before you make music, you need to pass one test: can you hear yourself through Ableton?
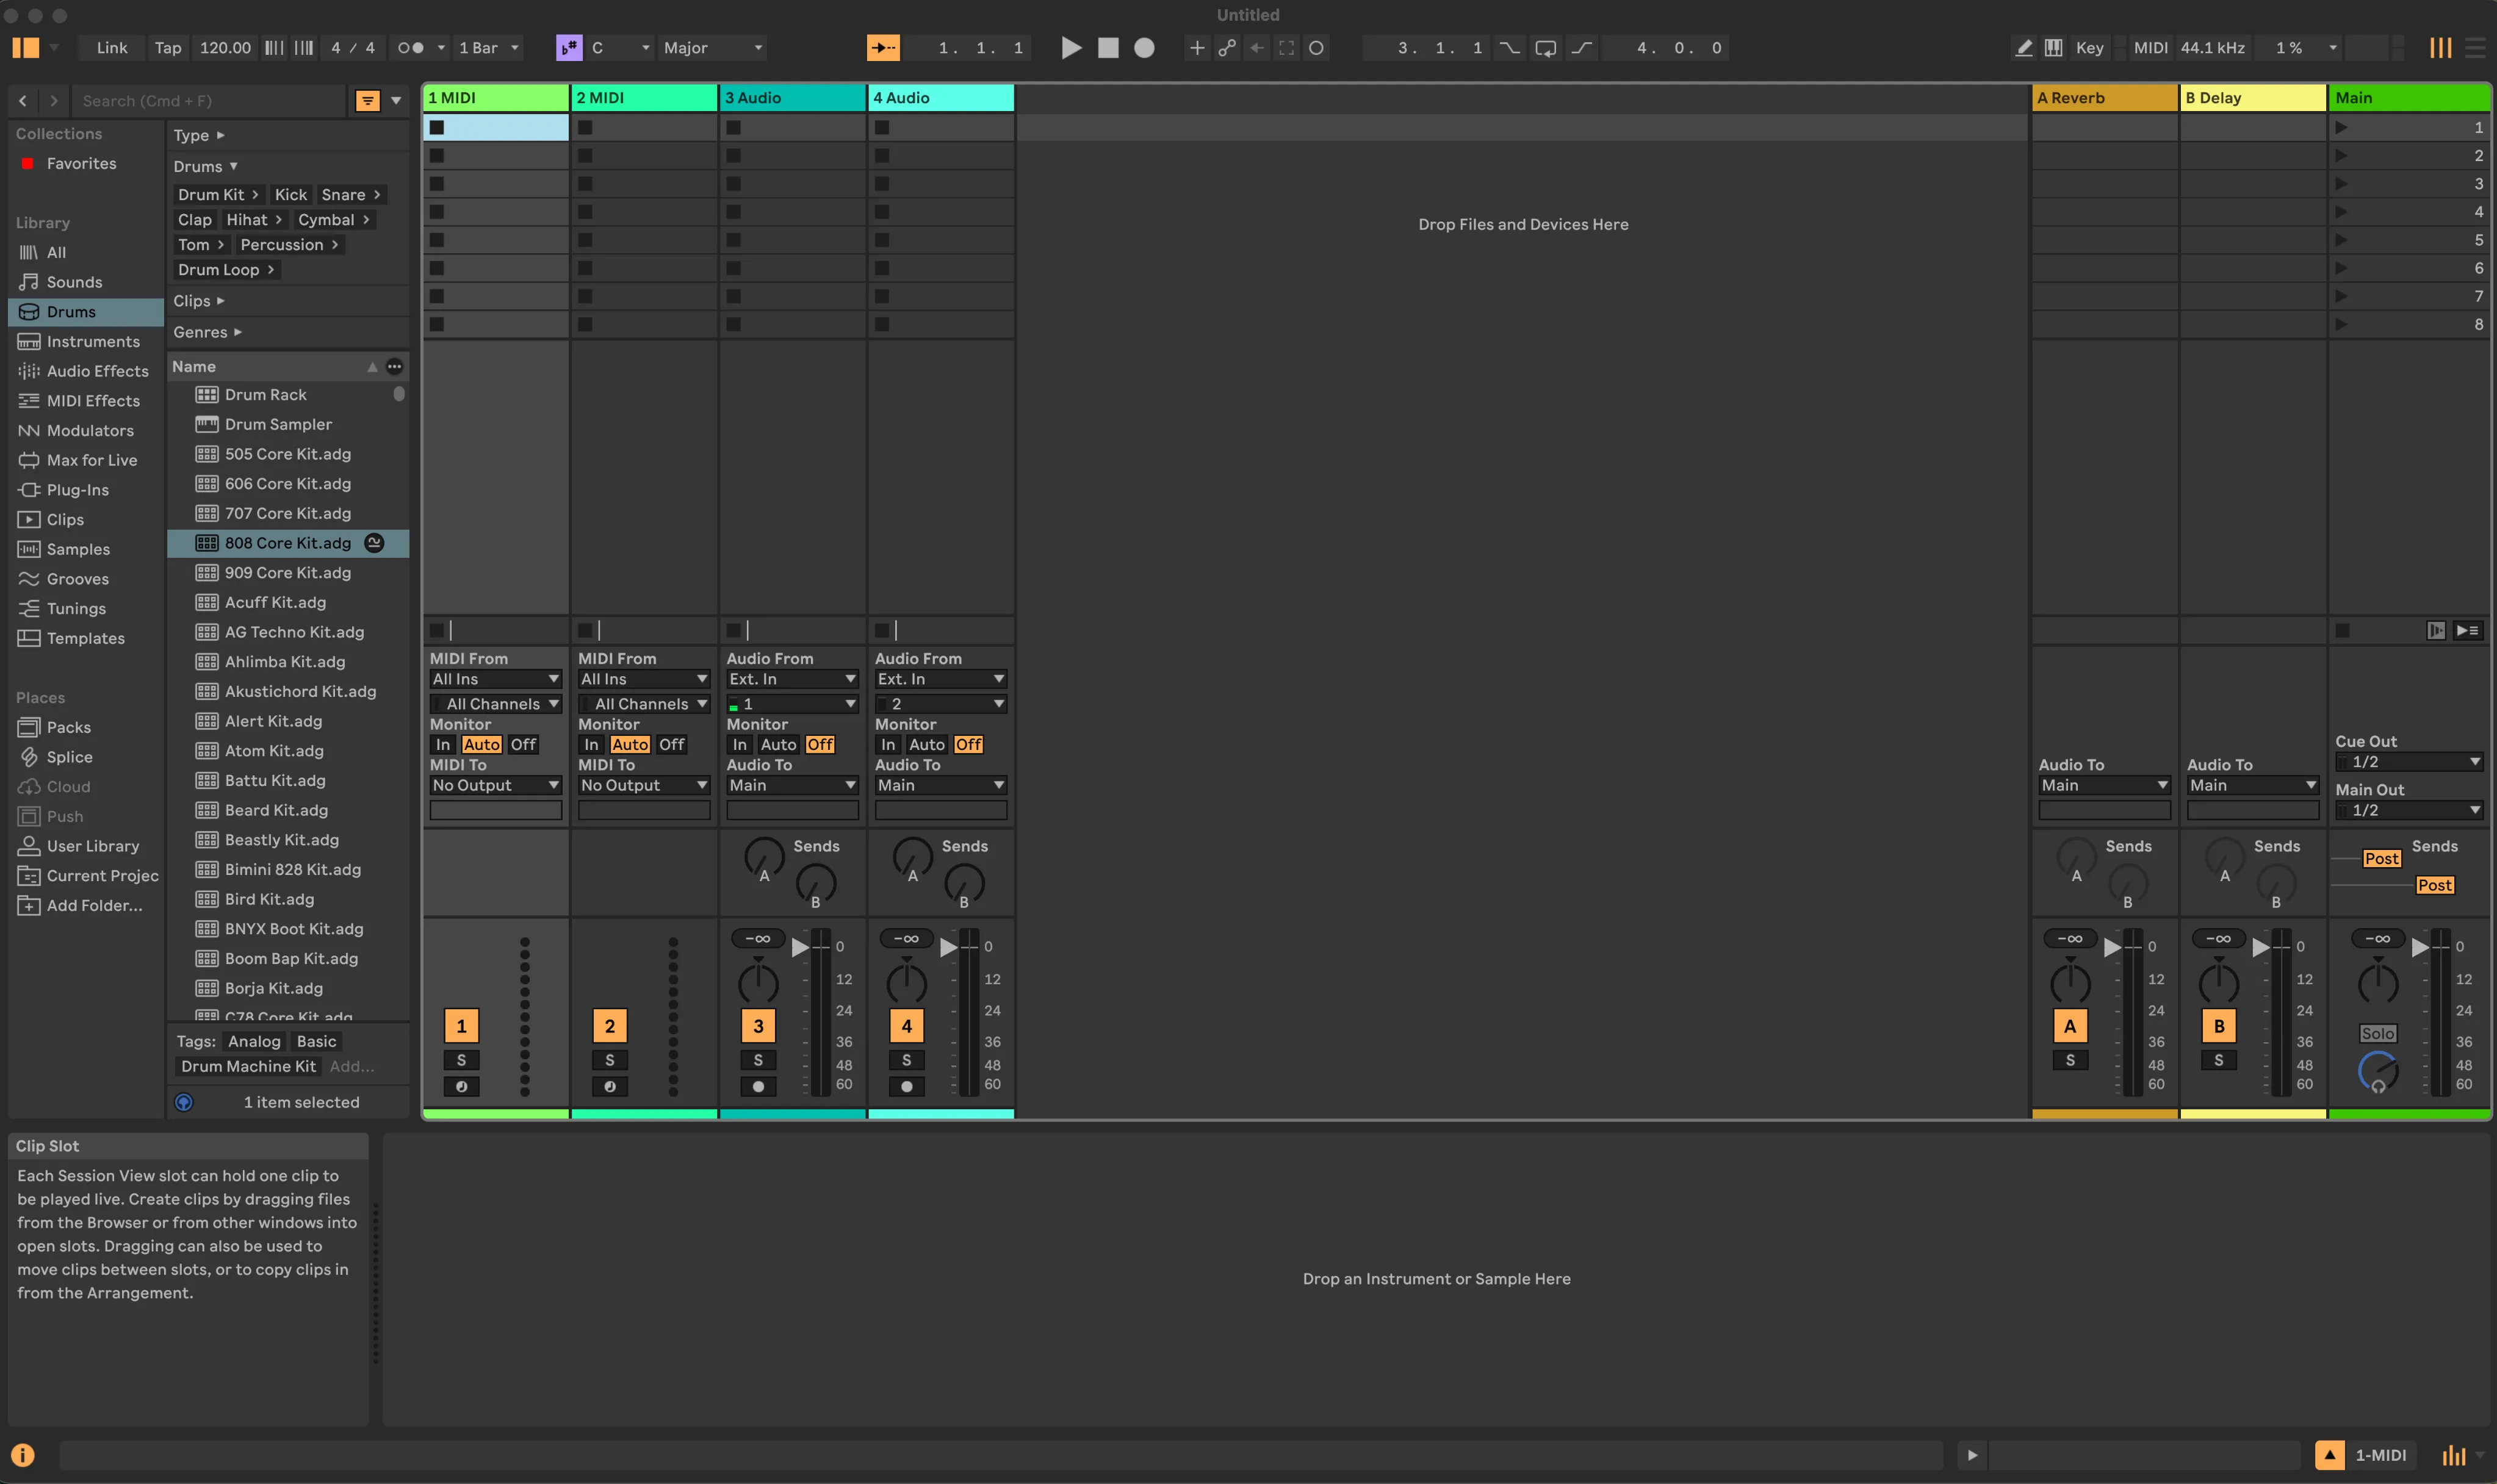
Open Ableton. New project. It’ll look like a spreadsheet designed by someone who listens to Aphex Twin. That’s Session View. We’ll mostly work here. Ableton has two views: Session View (the grid of clip slots) and Arrangement View (a traditional timeline). Press Tab to switch between them. This confused me at first because they look completely different and it felt like I’d accidentally opened a different program. You haven’t. It’s the same project, two ways of looking at it. Session View is for building and jamming. Arrangement View is for laying out a finished song. We’ll come back to Arrangement in Step 5.
Audio Preferences (Settings > Audio on Mac):
- Set your Audio Device to your Focusrite (mine shows as “Scarlett 4i4 4th Gen”)
- Sample Rate: 44100 Hz. Match this in Focusrite Control 2 or you’ll get crackling
- Buffer Size: 128 samples. This gives you around 6-8ms of latency, which feels responsive enough to play guitar without wanting to throw things
Now the step most tutorials forget to mention: click Input Config. Enable your mono inputs. If you skip this, your Focusrite inputs won’t appear in the track routing dropdowns and you’ll spend 30 minutes thinking your interface is broken.
Get signal flowing:
- Create an Audio Track (Cmd+T)
- In the I/O section, set “Audio From” to Ext. In, and the channel below it to 1 (or whichever input your guitar is plugged into)
- Set Monitor to Auto
- On your 4i4, plug your guitar into Input 1 and press the INST button so it lights up. This switches the input to instrument level. Without it, your guitar will sound like it’s being played underwater.
- Arm the track (click the little circle button until it turns red)
Strum. You should hear your guitar through your monitors.
If you don’t: check that the track is armed, INST is on, and the gain halo on the 4i4 is showing green (not nothing, not red). Also, if you’re on macOS Sonoma or newer, check that Voice Isolation isn’t enabled in Control Center. It aggressively filters non-voice audio and will destroy your signal. That one cost me time.
Now turn on the metronome (the tiny metronome icon in the transport bar at the top). Set a tempo. You have a click track.
You’re operational.
Step 1: Make a Beat (Drum Rack + MIDI Editor)
Now you need something to play over. We’re going to build a drum beat by hand. This matters even though an AI is going to do it for us later. You need to understand what a beat looks like inside a DAW so that when Claude generates one, you know what happened.
Create a new MIDI Track (Cmd+Shift+T). In the Browser on the left (Cmd+Opt+B if it’s hidden), click Drums and find Kit-Core 808. Double-click it. You now have an 808 drum kit loaded.
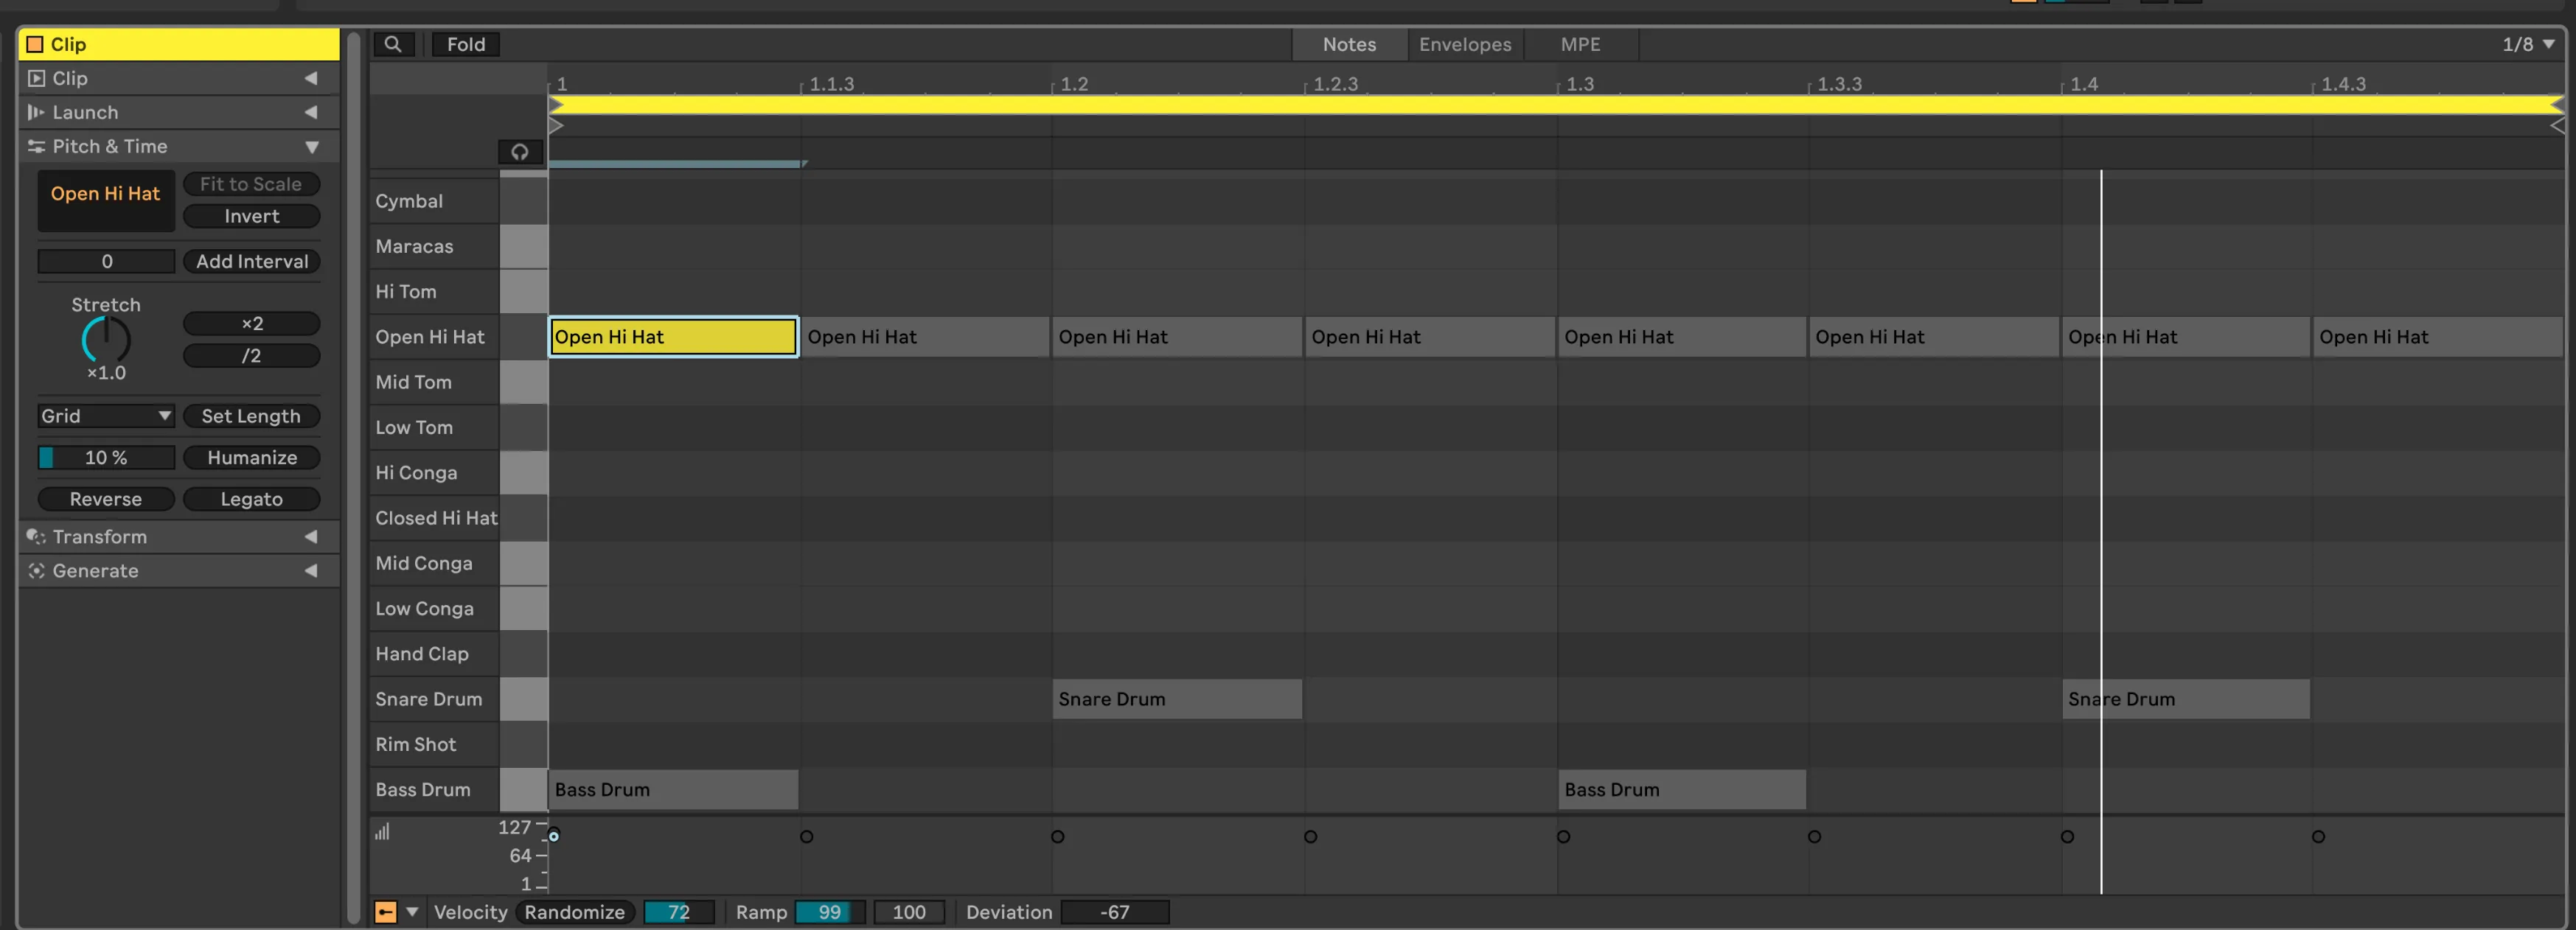
Double-click an empty clip slot on that track. A 1-bar MIDI clip appears and the Clip View opens at the bottom. You’re looking at a grid. The vertical axis is drum sounds (kick, snare, hi-hat, etc.). The horizontal axis is time.
If you want to practice drawing beats in the browser before committing to Ableton, I built Beat Asylum for exactly this. Same grid concept, no DAW required.
Press B to enter Draw Mode. Your cursor becomes a pencil.
The three sounds you care about:
- C1 = Kick
- D1 = Snare
- F#1 = Closed Hi-Hat
Set your grid to 1/8 notes (use Cmd+1 or Cmd+2 to narrow/widen until you see 8 columns per bar). Now draw this pattern:
Hi-Hat (F#1): x x x x x x x x
Snare  (D1):  . . x . . . x .
Kick   (C1):  x . . . x . . .
Kick on beats 1 and 3. Snare on 2 and 4. Hi-hats on every eighth note. This is the most basic rock beat that exists. It’s boring and it works.
Click the clip’s play button (the triangle in the clip slot). It loops. You have a drum beat.
Step 2: Record Guitar (Audio from Focusrite)
You have a beat. You have guitar signal flowing from Step 0. Now put them together.
Go back to your audio track from earlier (the one with your guitar input). Make sure it’s still armed (red circle button) and Monitor is set to Auto. You should hear your guitar when you play, and the drum beat should be looping on the MIDI track.
Set a tempo that feels comfortable. I went with 90 BPM. Not too fast to think, not too slow to groove.
Hit Record (the circle button in the transport bar, or just press F9). The clip starts recording. Play something over the beat. Anything. A riff, some chords, a single note repeated. Don’t think too hard about what. The point is to get audio into the DAW.
Hit Stop (spacebar).
You now have an audio waveform sitting next to your drum pattern. Hit play. They play together. Your guitar, recorded, playing back over a beat you drew with a pencil tool.
The first time I heard my guitar playing back over a beat I programmed, something clicked. It’s not a loop pedal. You can see the waveform. You can move it. You can undo. You can record another take on top. This is why people use DAWs.
If the take has dead space at the beginning or end, you can trim the clip by dragging its edges in the Arrangement View. Don’t overthink it. We’re going for “exists” not “perfect.”
Step 3: MIDI Controller + VST (Bass or Ambient Line)
Two tracks playing. Time for a third.
Create another MIDI track (Cmd+Shift+T). This one’s for your Minilab.
Quick Minilab setup if Ableton doesn’t auto-detect it: on the Minilab itself, press Shift + Pad 3 to enter DAW mode. In Ableton, go to Settings > Link, Tempo & MIDI. Set Control Surface to MiniLab 3, Input and Output to MiniLab 3 MIDI. Disable any ports labeled DIN THRU, MCU, or ALV. They cause conflicts.
Now load an instrument. The easiest path: in the Browser, click Sounds (not Instruments), then use the tag filter to search for “Bass” or “Pad.” These are pre-built Instrument Racks that work out of the box. Pick one. Drag it onto your new MIDI track.
Arm the track. Play some keys on the Minilab.
Sound comes out.
The Minilab has knobs that map to instrument parameters by default. I turned one and the pad sound morphed into something entirely different. I spent 20 minutes just turning knobs. This is the productivity trap they warn you about. The knobs are fun. Stay focused.
Record a bass line. Or an ambient pad. Something simple that sits under the guitar. Hit record, play along with the beat and your guitar playback, hit stop.
If your timing is rough, select all the MIDI notes in the clip (Cmd+A) and hit Cmd+U to quantize. This snaps notes to the grid. If it sounds too robotic, use Cmd+Shift+U to open quantize settings and set Strength to around 80%. That moves notes most of the way to the grid but keeps a little human slop. The difference between 100% and 80% quantize is the difference between a machine and a person who happens to have good timing.
You now have three tracks: drums (MIDI), guitar (audio), and bass or pad (MIDI). Playing together. This is a song. A bad one, maybe. But a song.
Step 4: The MCP Moment (Claude Code + Ableton)
This is the section that doesn’t exist in any other Ableton tutorial.
MCP stands for Model Context Protocol. It’s a way for AI tools like Claude to talk to other software. Someone built an MCP server for Ableton. Which means Claude Code can create tracks, load instruments, write MIDI, and control playback inside your DAW. From your terminal.
Setup takes about 5 minutes:
First, install the Remote Script that lets Ableton listen for commands:
- Go to the ableton-mcp repo
- Download the
AbletonMCP_Remote_Scriptfolder - Copy it to your Remote Scripts directory:
~/Music/Ableton/User Library/Remote Scripts/AbletonMCP/ - Restart Ableton
- Go to Settings > Link, Tempo & MIDI
- Set one of the Control Surface slots to AbletonMCP (leave Input and Output as “None”)
Then add the MCP server to Claude Code:
claude mcp add-json "AbletonMCP" '{"command":"uvx","args":["ableton-mcp"]}'Open a new Claude Code session. You should see MCP tools available (the hammer icon). Ableton should be running with the Remote Script active.
Now type something like:
“Create a new MIDI track with a drum rack. Write a boom-bap drum pattern at 90 BPM. Use a Kit-Core 808.”
Watch your screen. A track appears in Ableton. A clip fills with MIDI notes. Hit play. There’s a beat.
I typed “make me a drum beat” into my terminal and heard it playing in Ableton three seconds later. I’ve been programming computers for 15 years and making music for longer. This is the first time those two worlds actually merged.
The real power is iteration. You don’t have to get the prompt right the first time:
“Make the hi-hats swing more.”
“Add an open hi-hat on the and of 4.”
“Drop the kick pattern to half-time for bars 3 and 4.”
“Add a bass track with a simple root-note pattern.”
Each prompt modifies what’s already there. You’re having a conversation with your DAW. It turns Ableton’s cluttered UI into a conversation. The AI understands musical concepts because it understands language, and music has a vocabulary: swing, ghost notes, four-on-the-floor, syncopation, half-time. You already know these words. Now they’re commands.
The demo: I had Claude generate a beat, tweaked it with two follow-up prompts, then recorded guitar over it. The whole thing took maybe 10 minutes. The beat was better than what I drew by hand in Step 1. Not because I can’t learn to program better beats. Because the AI has heard every beat pattern that exists. It’s a collaborator that’s listened to more music than you have.
Play guitar over the AI-generated beat. Record it. This is your track.

Step 5: Mix & Ship
You have tracks. Let’s finish this.
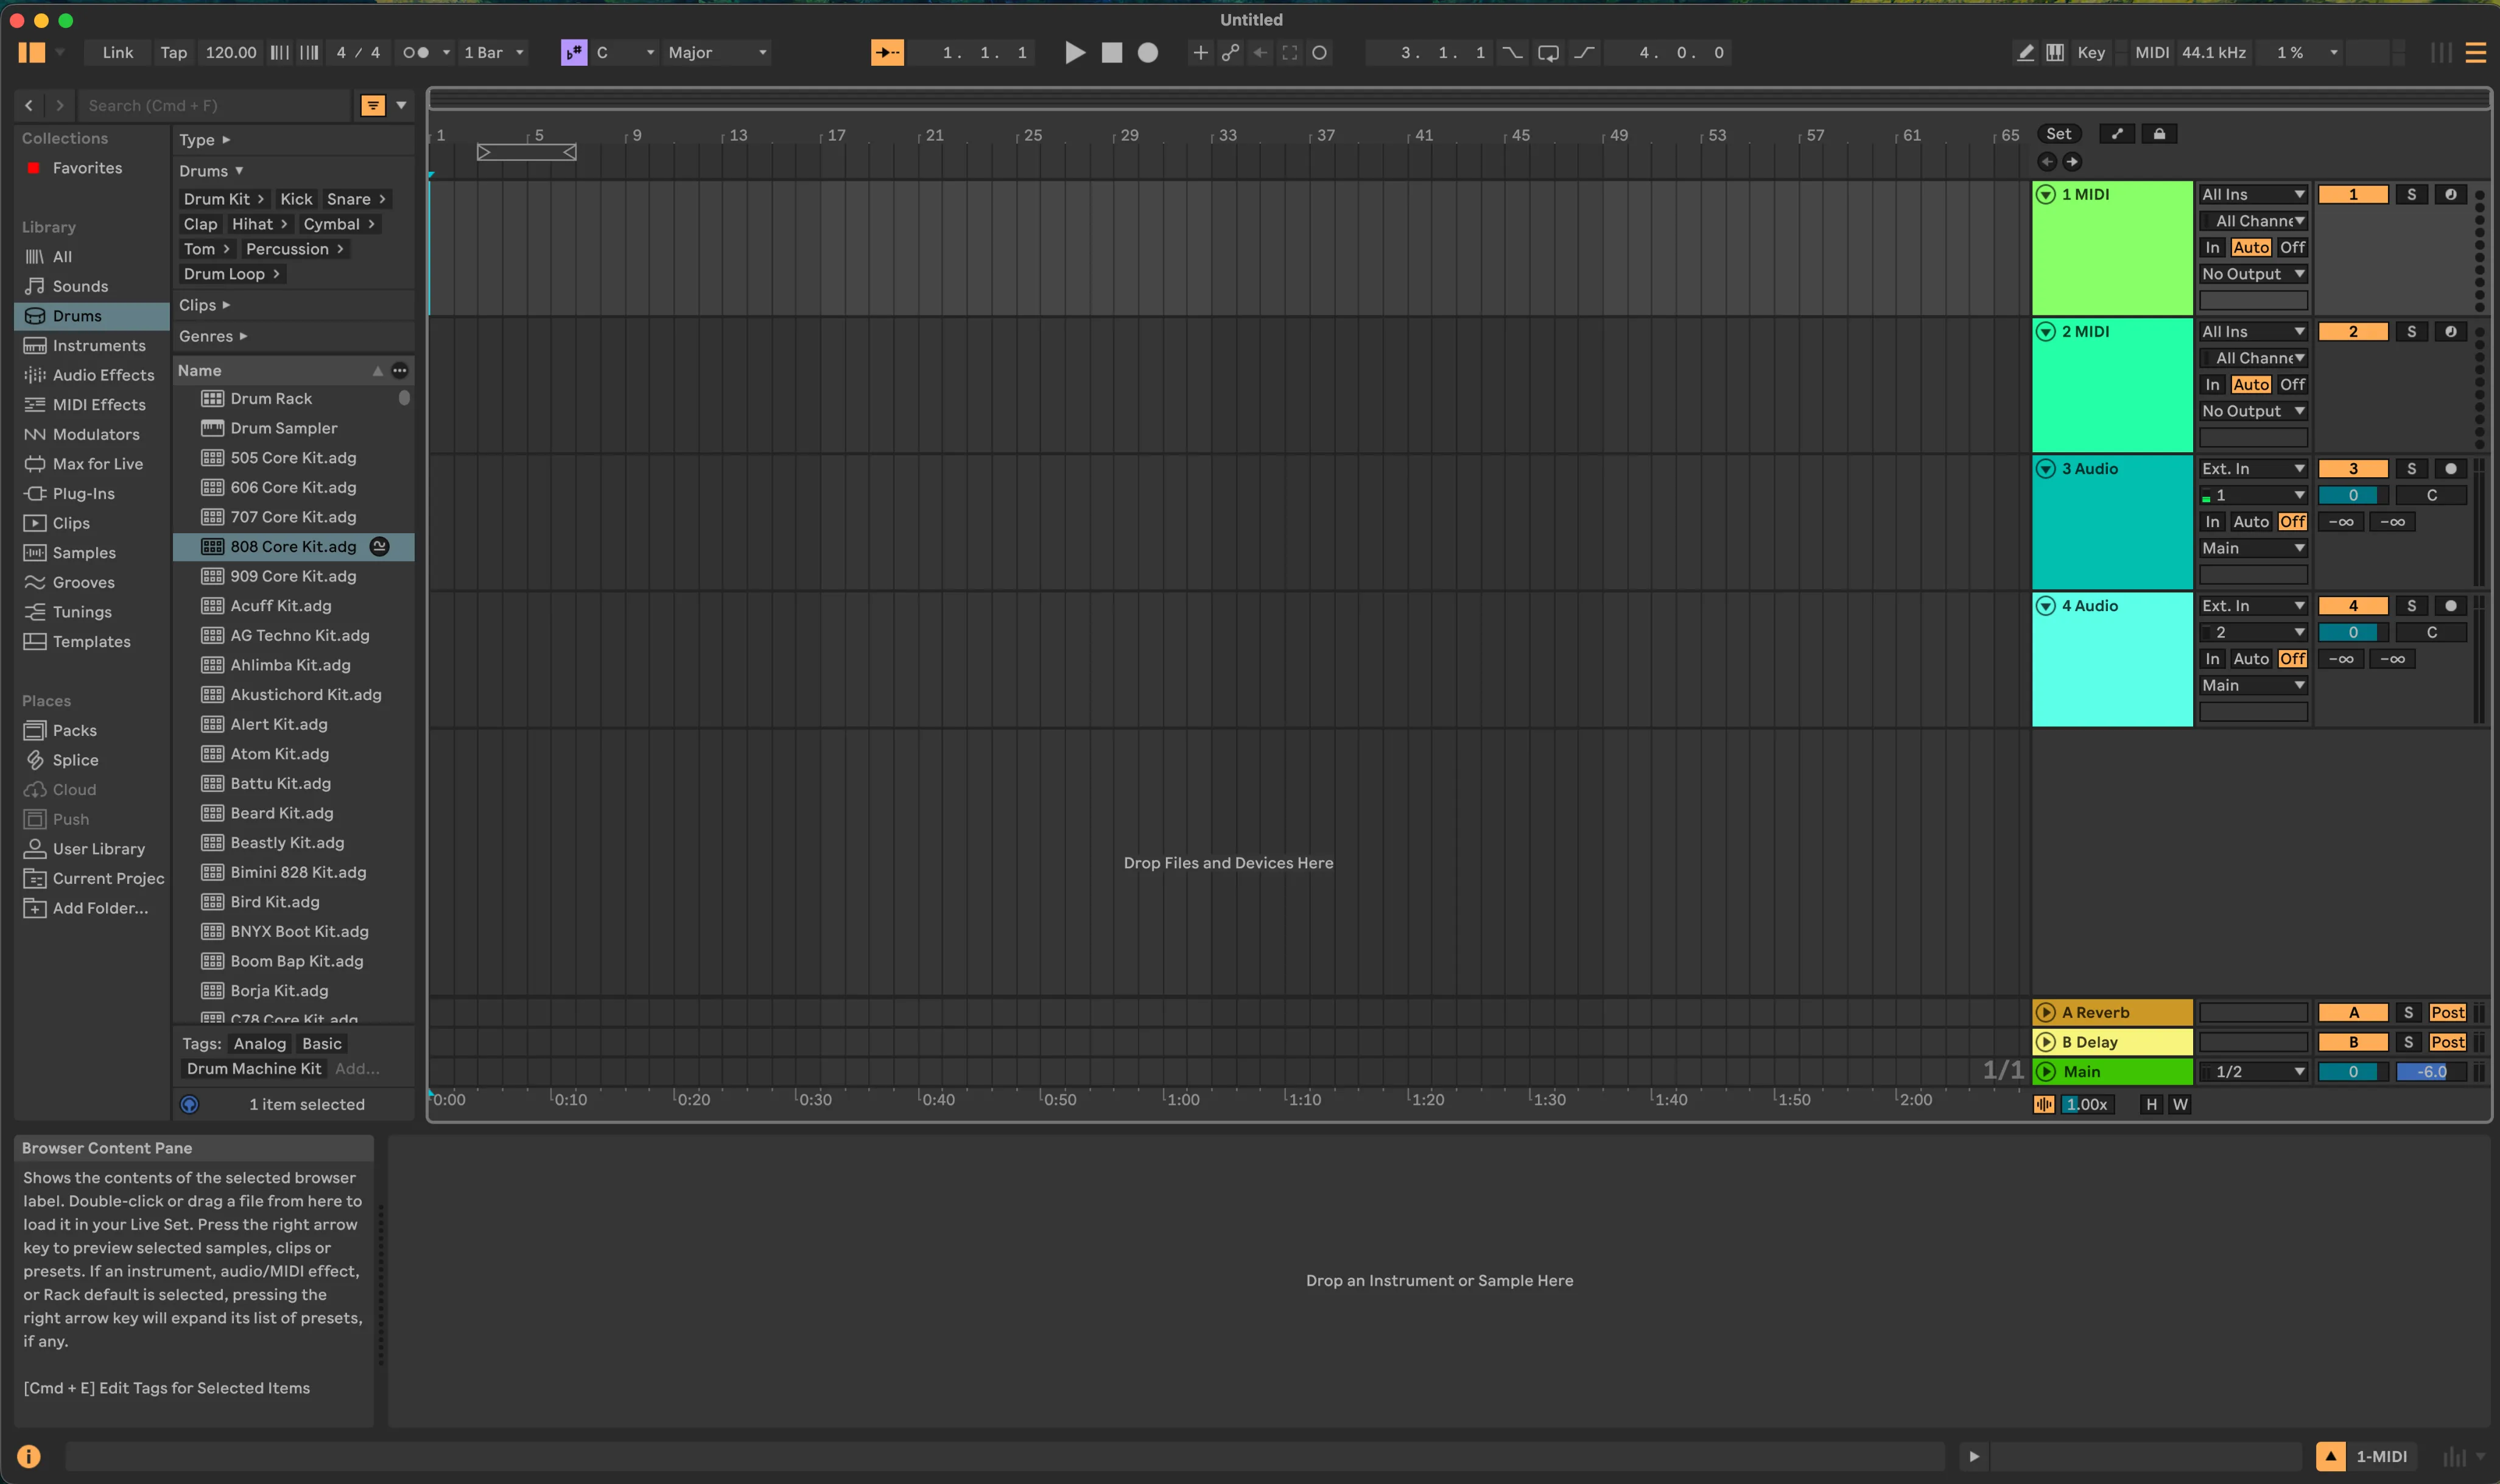
First: if you’ve been working in Session View (the grid of clip slots), you need to get your arrangement into Arrangement View (press Tab to switch). This trips up every beginner. Session View is where you build and trigger clips. Arrangement View is the timeline where you lay out a song from start to finish. If you skip this step and try to export, you’ll get silence. Ask me how I know.
The simplest way to move over: go back to Session View, trigger all the clips you want playing together, then hit the global Record button in the transport bar. Ableton records your session performance into the Arrangement timeline in real time. Play your clips, switch between them if you want, stop after however many bars you want. 16, 32, whatever feels like a complete idea. Now switch to Arrangement View and you’ll see it all laid out.
Volume balance. Pull all track faders down to about -10 dB. Bring the drums up first. They’re the anchor. Then the bass. Then the guitar. Watch the Master meter. If it’s hitting red, pull everything down. You want the Master peaking around -3 to -6 dB.
That’s it. That’s the mix. I know there’s EQ and compression and reverb sends and sidechain and a thousand other things. None of them matter right now. Levels and balance. If you can hear everything and nothing is clipping, you’re done.
Pan. The pan knob is above each track’s volume fader. Bass and kick stay centered. Put the guitar slightly off-center (maybe 20% left or right). If you have a pad, put it opposite. This creates a little width and keeps things from fighting.
Export. Cmd+Shift+R (File > Export Audio/Video).
- Make sure the loop brace in Arrangement View covers your full piece plus a bar or two of tail room (reverb/delay need space to decay)
- Rendered Track: Master
- File Type: WAV
- Sample Rate: 44100
- Bit Depth: 16
- Normalize: Off
Click Export. You have a WAV file. Export again as MP3 320kbps if you want a smaller file for sharing.
Ship it. Post it on SoundCloud. Upload to YouTube with a static image. Send it to a friend. Put it anywhere. The point is not that it’s good. The point is that it exists. You went from nothing to a finished audio file in a weekend, and the last beat was written by an AI that you directed from a terminal.
The mix isn’t great. I know that. But I have a finished thing. A drum beat (that an AI wrote), a guitar part (that I played), and a bass line (from a tiny keyboard). Exported. Real. That’s the point.
Where to Go From Here
This post got you operational. Everything past this point is about getting good, which is a different project entirely. Here’s where I’d look next, organized by what you’ll want to learn first:
Learn how Ableton thinks:
- learningmusic.ableton.com — interactive, browser-based. You already know music theory. This teaches you how a DAW thinks about beats, melody, and structure. Free.
- learningsynths.ableton.com — same format, focused on synthesis. If you’ve never programmed a synth, start here. Free.
Watch someone who’s good at this:
- Ethan Davis — “The NEW Ableton 12 Beginner Guide” (YouTube, 22 min) — The best single video for getting oriented in Ableton 12. Covers the interface, clips, tracks, and workflow in a way that actually sticks.
- You Suck at Producing (YouTube) — Entertaining and actually teaches real production workflow. The series walks through Ableton features without putting you to sleep.
- Andrew Huang (YouTube) — Multi-instrumentalist who bridges “I play guitar” to “I produce music.” His challenge videos show what’s possible.
Read:
- “Making Music” by Dennis DeSantis — Written by Ableton’s Head of Documentation. Short standalone chapters about the creative process of making music with technology. Not a manual. This addresses the real problem: you know how to play, but finishing a track is a different skill.
- “Mixing Secrets for the Small Studio” by Mike Senior — For when you’re past “can I hear everything” and into “why doesn’t this sound like a real song.” Practical, assumes you’re in a bedroom.
Take a structured course:
- Berklee “Introduction to Music Production” (Coursera) — DAW-agnostic fundamentals from Berklee. Covers signal flow, EQ, compression, mixing basics. Free to audit.
Join a community:
- r/ableton — Almost any question you have has been asked and answered. Lurk first.
- llllllll.co (Lines) — If you lean toward experimental or ambient music. Smaller, more thoughtful, very technical.
Go deeper on AI + Ableton:
- ableton-mcp — The server we used. Star it.
- Producer Pal — A Max for Live device that does similar things but with a GUI. Supports Claude, ChatGPT, Gemini. Won honorable mention in Anthropic’s “Built with Claude” contest.
- ableton-copilot-mcp — More capable MCP server with Arrangement View support and state rollback. Worth upgrading to once you’ve outgrown the basics.
Gear Recommendations
If you’re starting from scratch, here’s what I’d buy. These aren’t the only options, but they’re what I’d hand someone who asked “what do I get?”
Audio Interfaces:
| Interface | Price | Why |
|---|---|---|
| Focusrite Scarlett 4i4 (4th Gen) | ~$350 | My pick. 4 in/4 out, built-in MIDI I/O, room to grow. |
| Focusrite Scarlett 2i2 (4th Gen) | ~$180 | The most popular beginner interface. 2 in/2 out. If you only need one input at a time, save the money. Includes Ableton Live Lite. |
| Audient iD4 MKII | ~$200 | Best preamp quality at this price. Dead simple. One mic + one instrument DI. |
| Universal Audio Volt 176 | ~$230 | Built-in 76-style compressor and vintage mode. Guitar sounds finished on the way in. |
MIDI Controllers:
| Controller | Price | Why |
|---|---|---|
| Arturia MiniLab 3 | ~$109 | My pick. 25 keys, 8 pads, 8 knobs, 4 faders. Best balance of everything in this size. Comes with Analog Lab Intro. |
| Akai MPK Mini MK3 | ~$100 | Best seller for a reason. 25 keys, 8 MPC pads, 8 knobs. Leans toward beat-making. |
| Novation Launchkey Mini MK4 | ~$130 | Deepest Ableton integration out of the box. Auto-maps to Session View, mixer, devices. Ships with Ableton Live Lite. |
| M-Audio Keystation Mini 32 | ~$50 | The budget pick. 32 keys, nothing else. If you just need keys and already have pads/knobs elsewhere. |
Ableton Live 12: There’s a 90-day free trial of Suite (the full version). No credit card required. After that: Intro is $99, Standard is $349, Suite is $599. Start with the trial. You’ll know what you need by the time it expires.
Six steps. A drum beat drawn by hand. A guitar recorded through an interface. A bass line from a tiny keyboard. And a beat that an AI wrote because I asked it to in plain English.
None of it is good yet. All of it is real. That’s the starting line.